IO Editor
This section describes the functions of the IO editor.
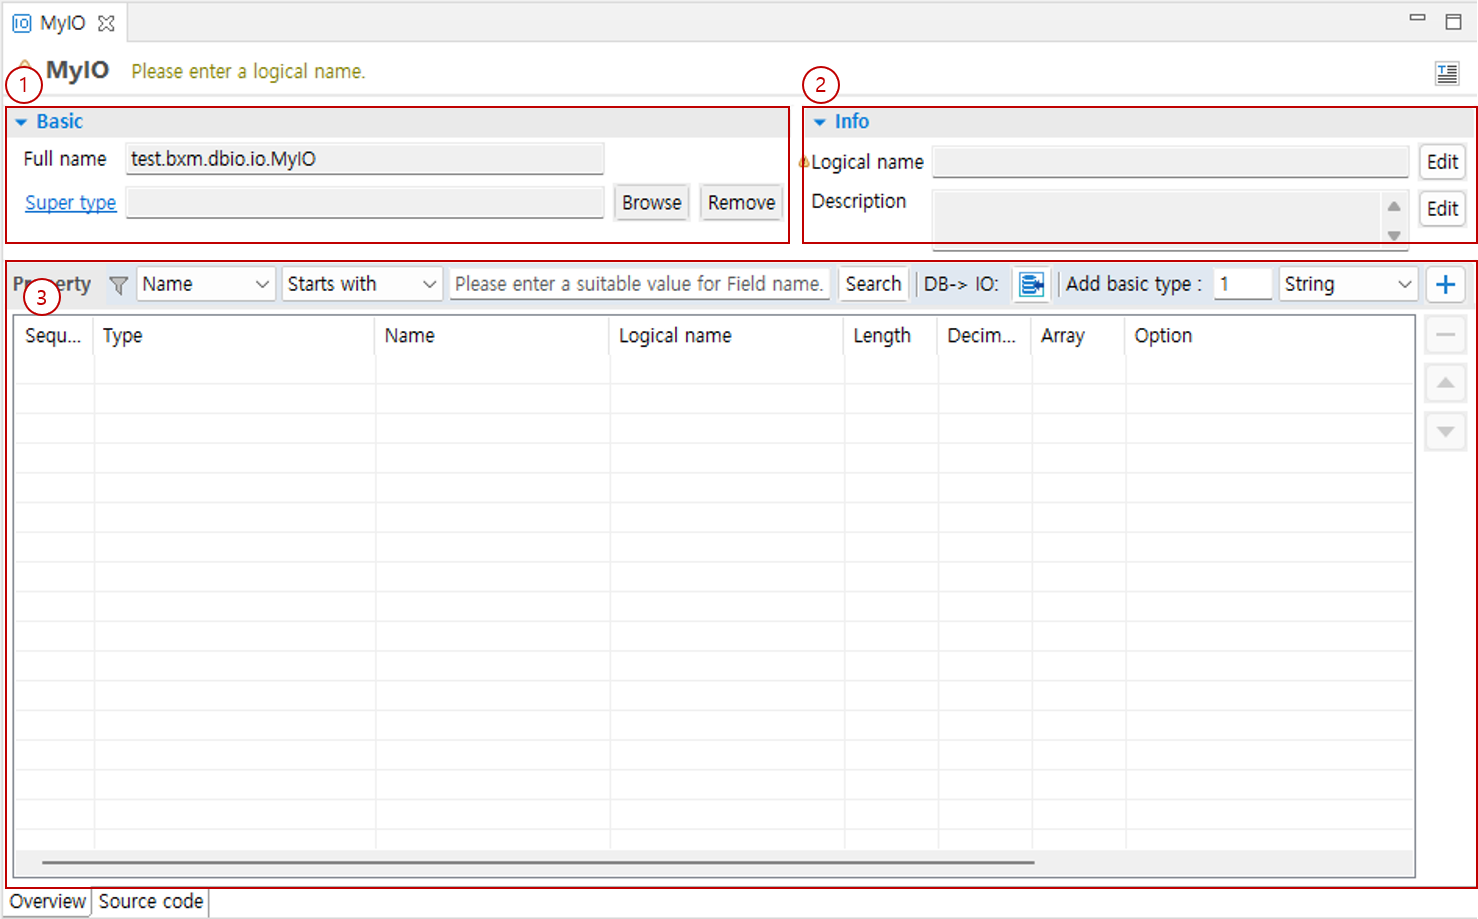
1. Editor Layout
-
Basic: You can check the Supertype and other information.
-
Info: You can check the basic information of the IO.
-
Property: You can manage the properties of the IO.
1.1. Basic
You can check the Supertype and other information.

-
Full name: You can check the full name of the IO.
-
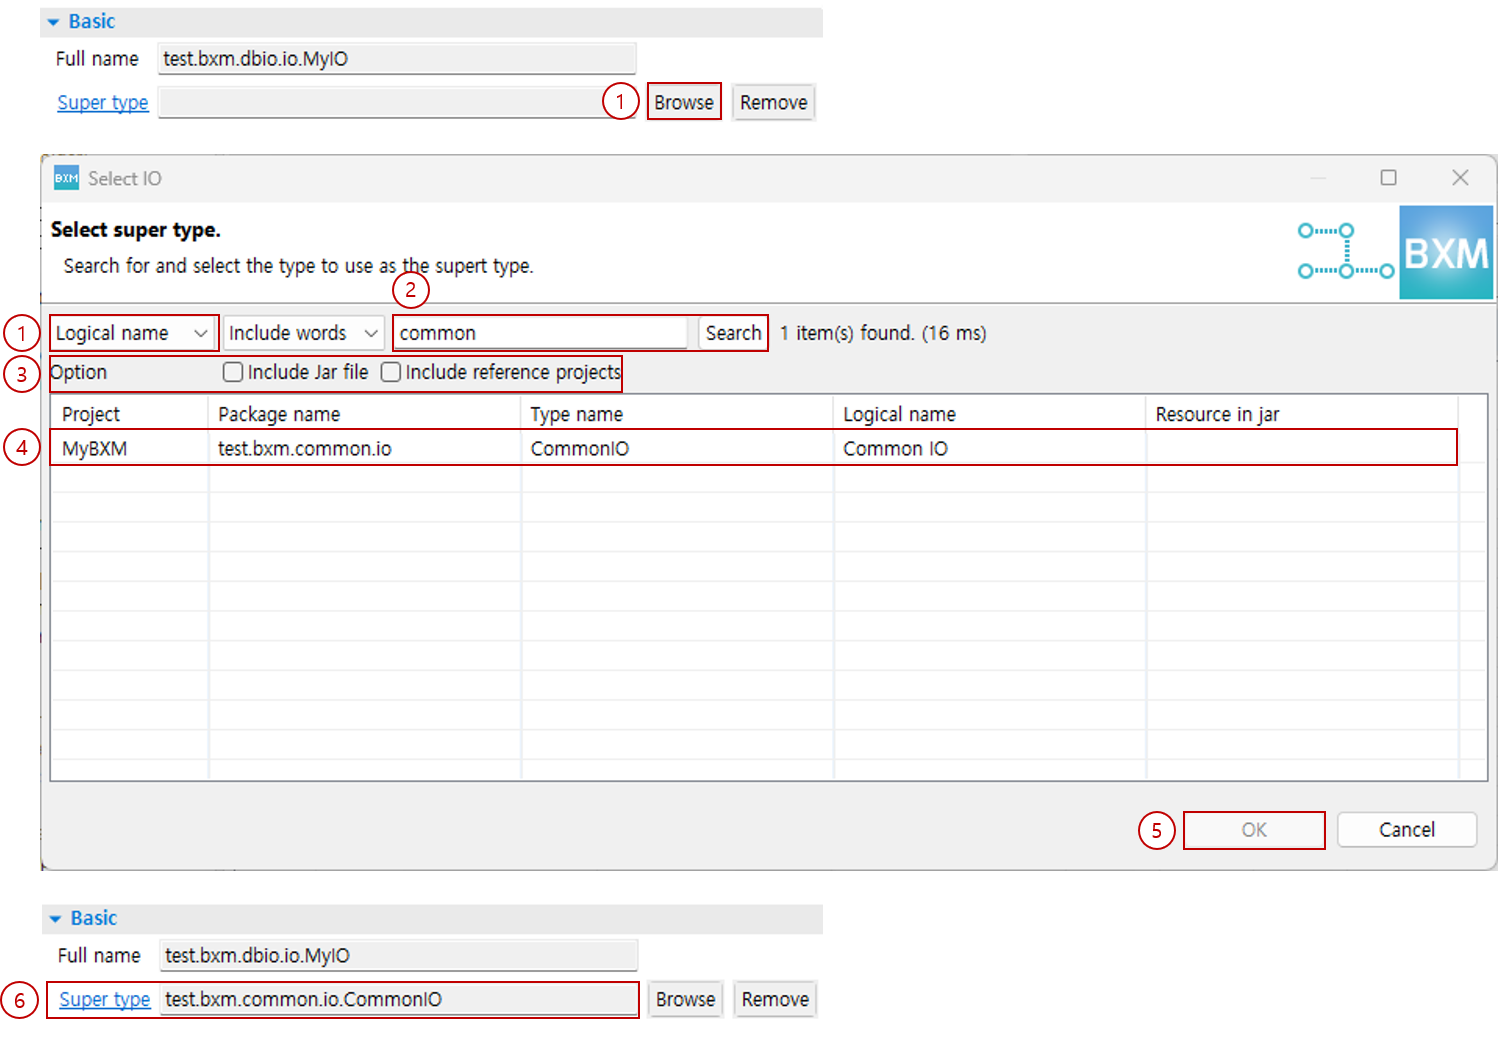
Super type: You can set/delete the Supertype of the IO.
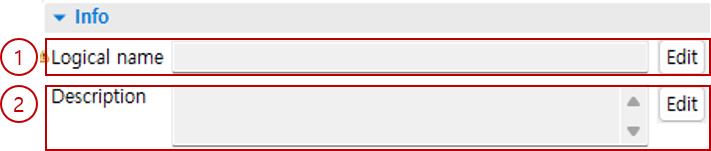
1.2. Info
You can check the basic information of the IO.
-
Logical Name: You can edit the logical name of the IO.
-
Description: You can edit the description of the IO.
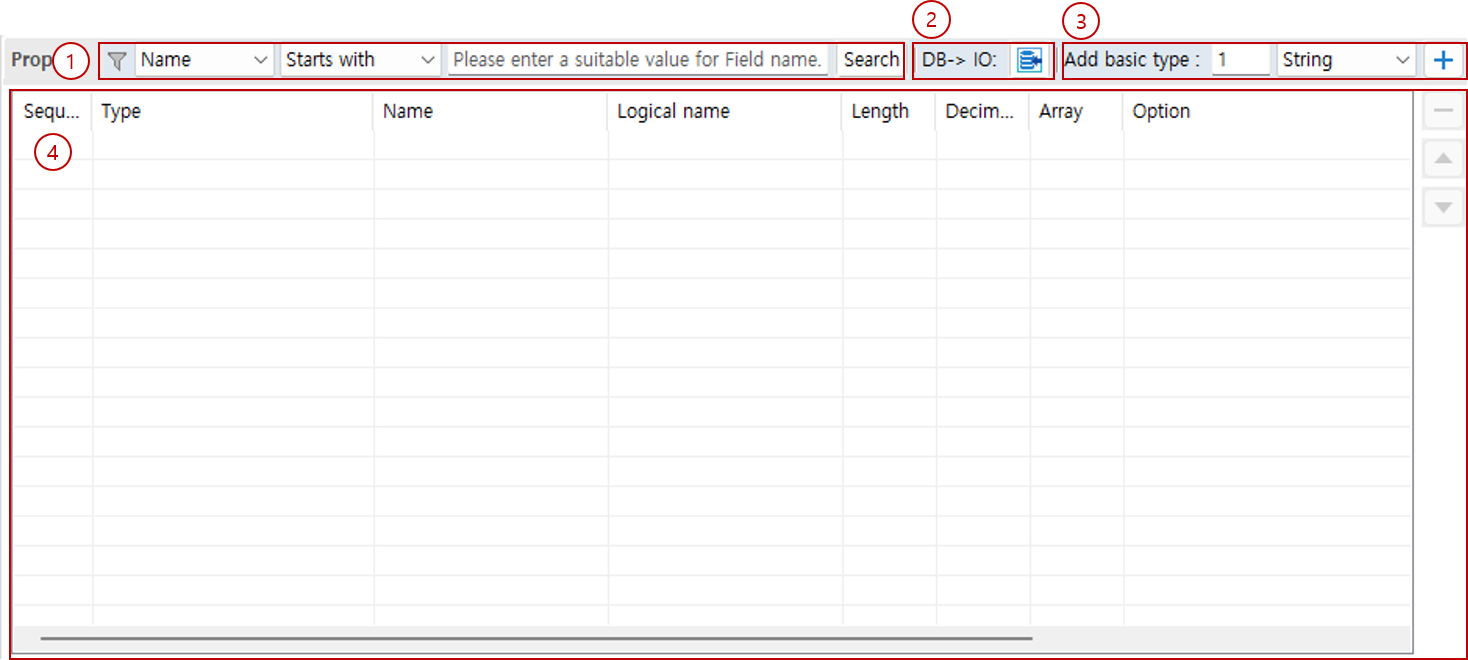
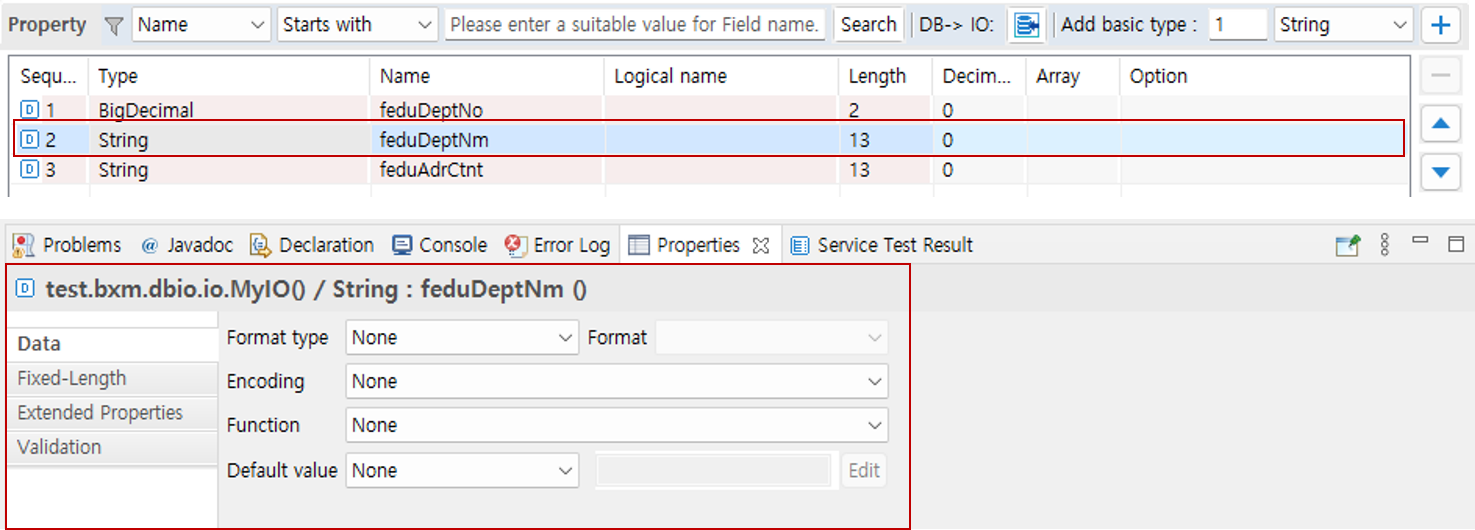
1.3. Property
You can manage the properties of the IO.
-
Find Variable: You can search for properties whose names match the condition.
-
DB→IO: You can add properties by selecting tables/columns.
-
Add basic type: You can add properties of the selected type by the specified count.
-
Property: You can add/delete/edit the properties of the IO.
2. Super type
You can set/delete the Supertype of the IO.

3. Add Property
This section describes how to add properties.
3.1. Add as Basic Type
You can add a basic type as a property using the toolbar function.
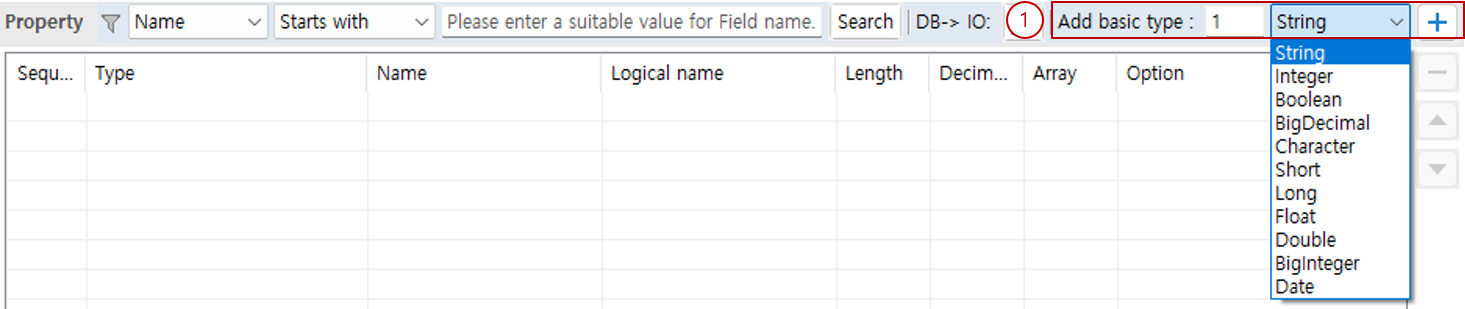
-
Select the count and the type to add, then click the + button.
3.2. Add via Context Menu
You can add properties via the context menu.
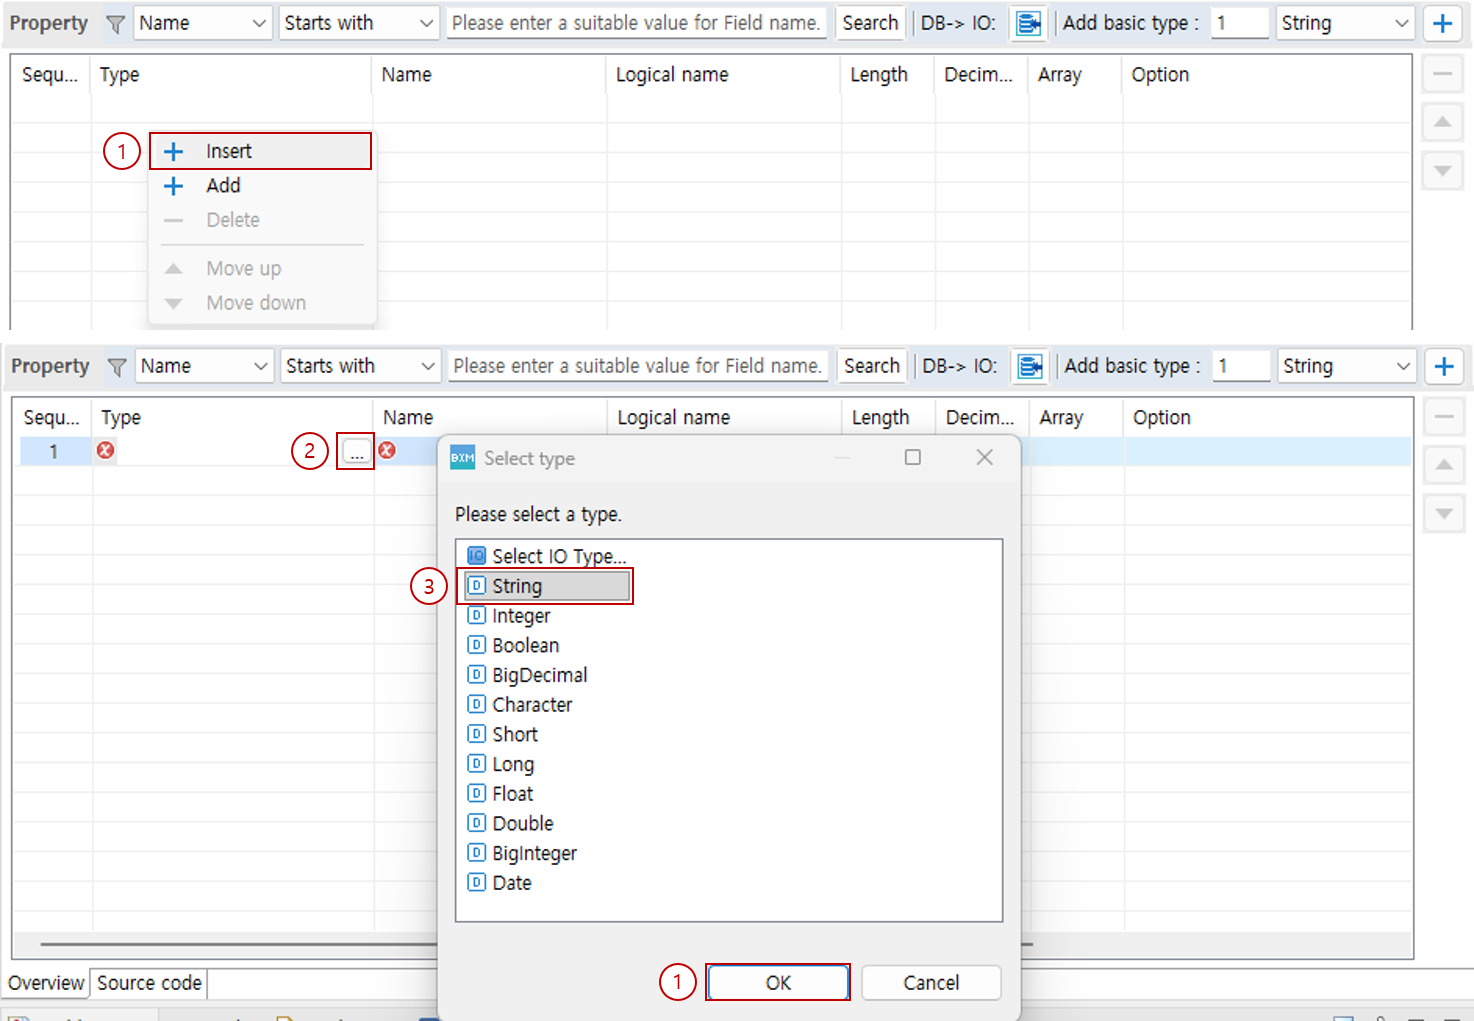
-
In the property list, right-click and select Insert or Add from the context menu.
-
Click … in the type column of the added property.
-
In the Select Type Dialog, select the type to use.
-
Click the OK button.

-
Enter the name, length, and other remaining information of the added property.
3.3. Add via DB→IO Function
You can add properties by selecting tables/columns.
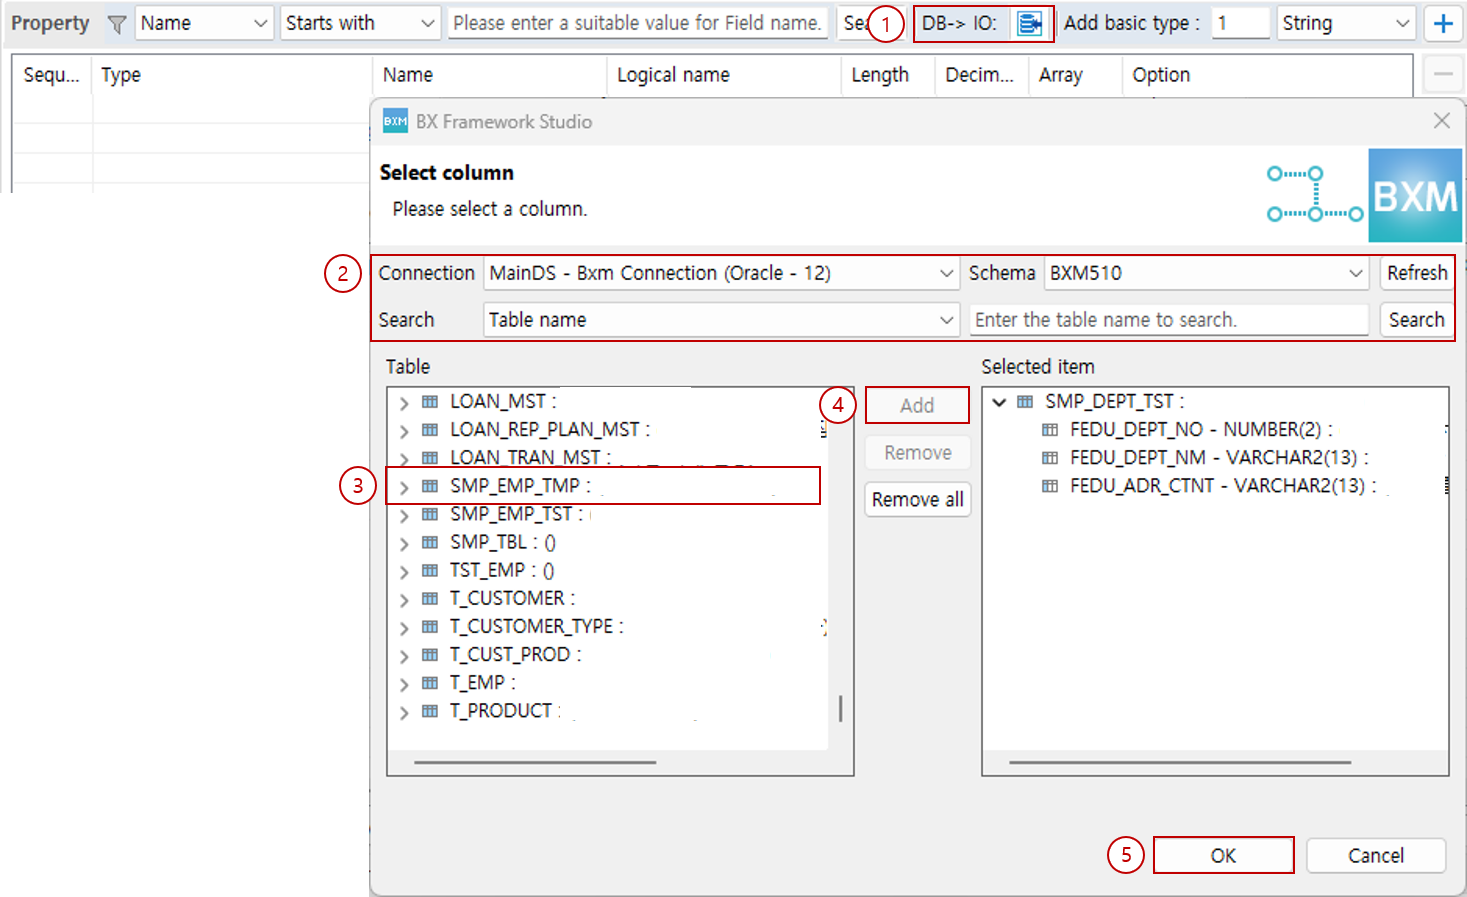
-
Click DB→IO.
-
Enter the search conditions.
-
From the search results, select the table or column to use.
-
Double-click the selected items or click the Add button to move them to Selected Item.
-
Click the OK button.

Check the added properties.
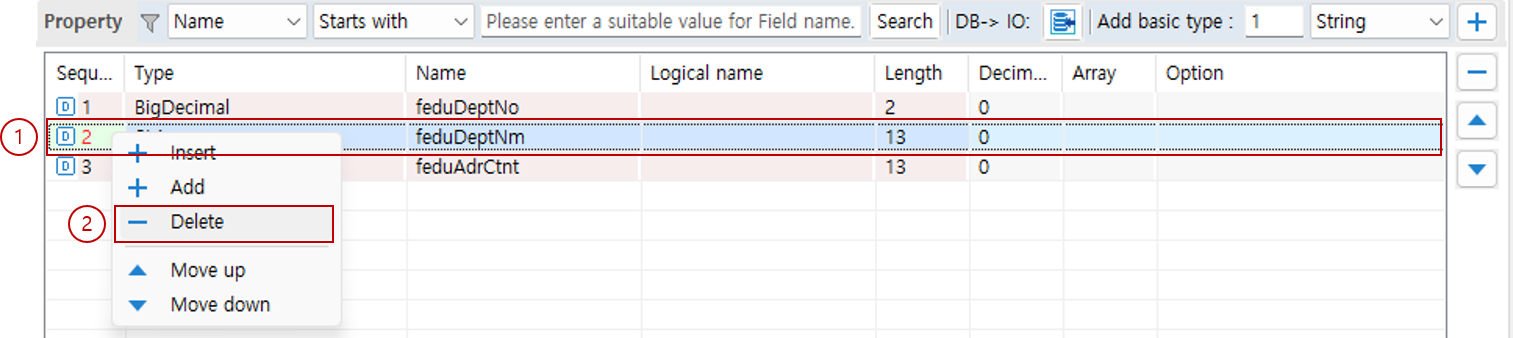
4. Change Property Order


5. Delete Property

6. Detailed Property Attributes
This section describes the detailed attributes that can be set for a property.
When you select a property, you can set the detailed attributes in the Properties viewer.
6.1. Format Type
Specifies the format type to apply to the property data when the IO is converted to a message.
6.1.1. Date Format
Available when the property type is Date. It is ignored if applied to other types.
-
Object → Message: Converts the
Dateobject to a string in the specified format. -
Message → Object: Converts the string in the specified format to a
Dateobject.
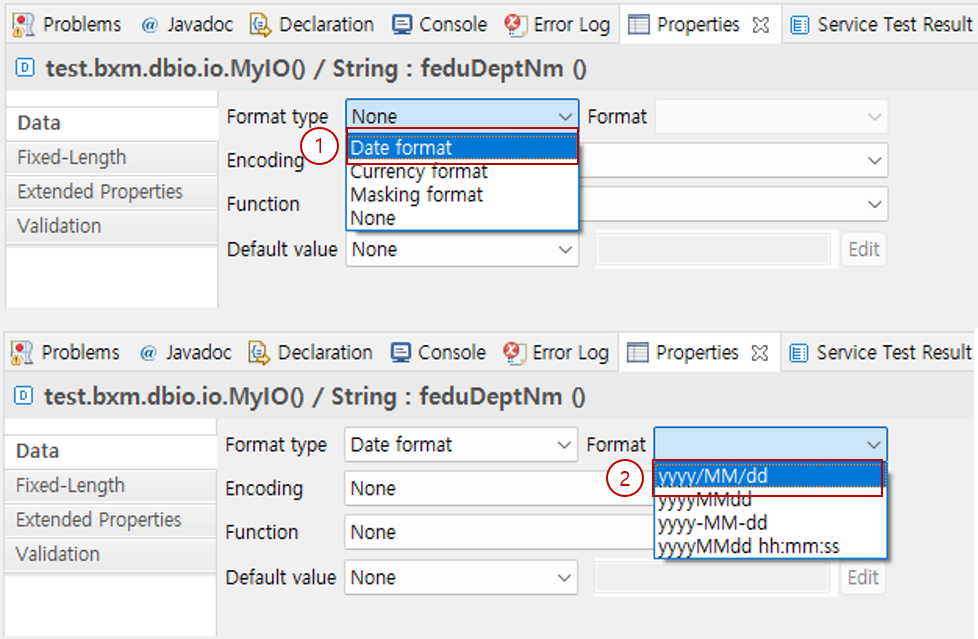
-
Select Date Format in the format type.
-
Select the format you want to use in Format. The available format list can be specified in the admin configuration.
6.1.2. Currency Format
Available when the property type is a numeric type such as Integer, Long. It is ignored if applied to other types.
-
Object → Message: Converts objects such as
Integer,Longto a string in the specified format. -
Message → Object: Converts the string in the specified format to objects such as
Integer,Long.
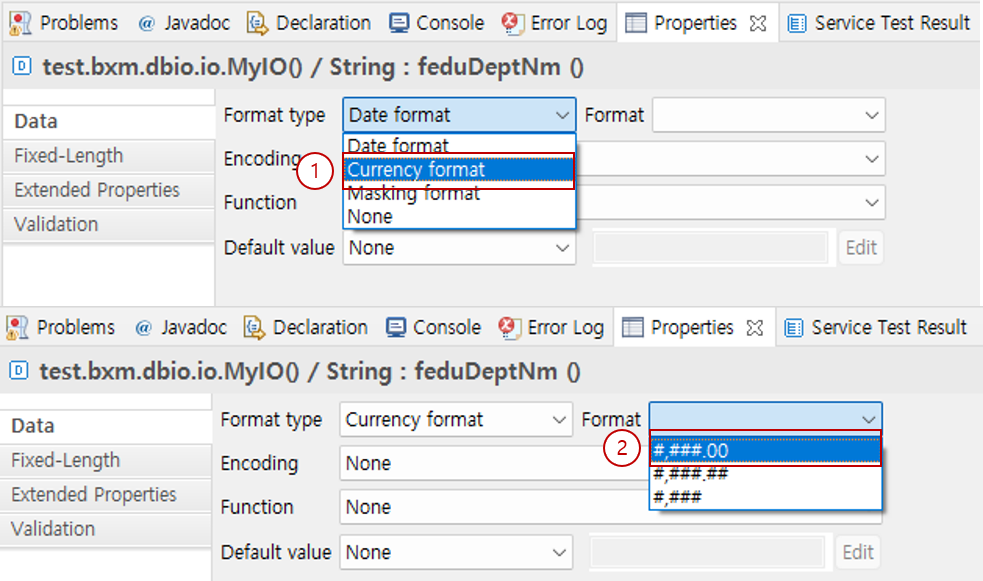
-
Select Currency Format in the format type.
-
Select the format you want to use in Format. The available format list can be specified in the admin configuration.
6.1.3. Masking Format
Available for properties of all types.
When you pass an IO to logger as an argument for logging and the properties of the IO contain sensitive information such as user identification numbers or passwords, such information may remain in logs as is, causing security issues. In this case, by applying masking to the properties containing sensitive data, you can prevent sensitive data from remaining in logs.
|
Unlike Date Format and Currency Format, Masking Format is not applied when the object is converted/encrypted/decrypted to data. |
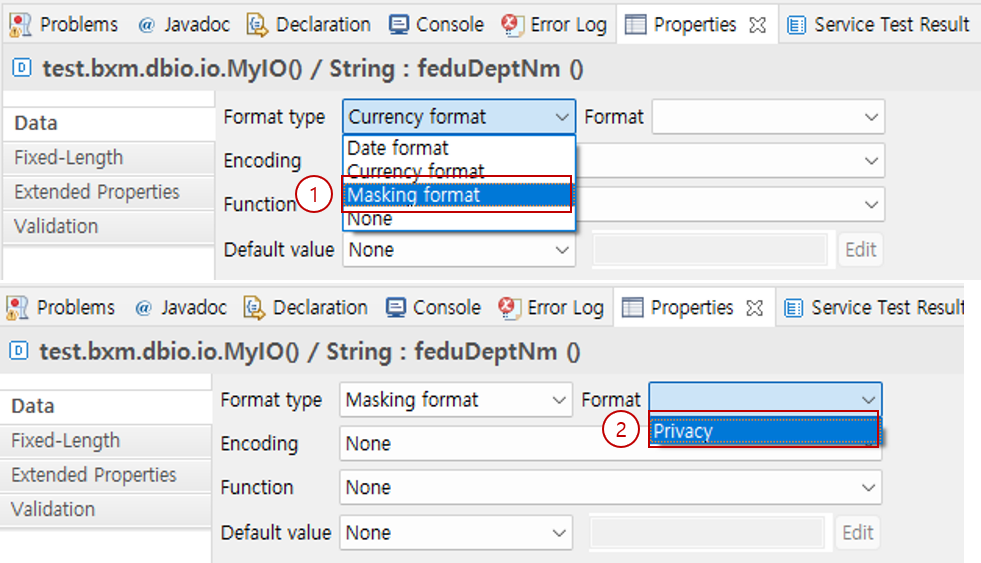
-
Select Masking Format in the format type.
-
Select the format you want to use in Format. The available format list can be specified in the admin configuration.
6.2. Encoding
You can make the IO be converted to the specified character set when it is converted to Fixed-Length data.

-
Select the character set to use in Encoding. The available character set list can be specified in the admin configuration.
6.3. Function
You can call the API corresponding to the specified function in the system pre-process to convert data.
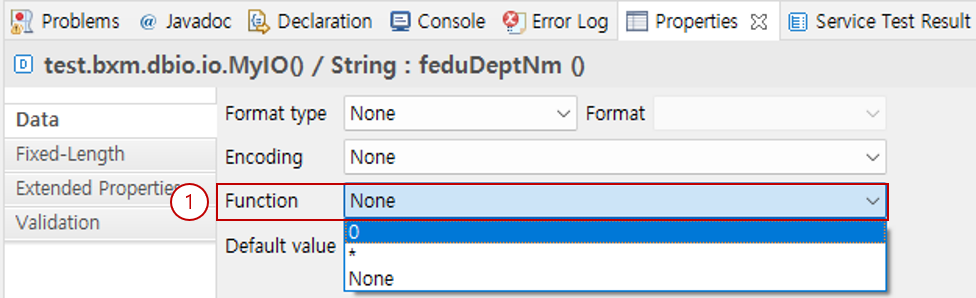
-
Select the function to use in Function. The available function list can be specified in the admin configuration.
6.4. Align
Specifies how to align data when the IO is converted to Fixed-Length data.
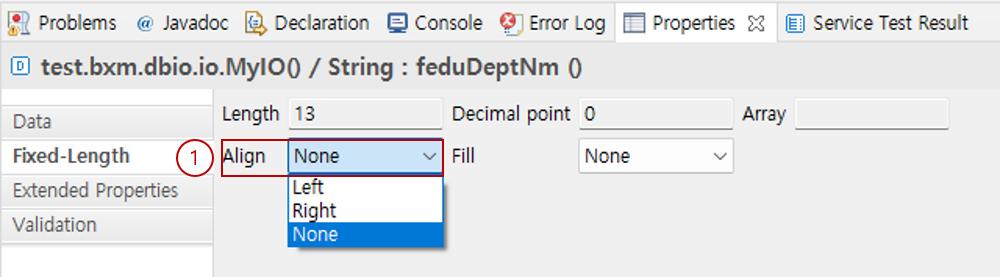
-
Select the alignment method.
Example) When data='test', length='10', fill=' '
-
Left: [test ]
-
Right: [ test]
If not specified - Number: Left, Character: Right
-
6.5. Fill
Specifies the character to fill the remaining space when the IO is converted to Fixed-Length data.
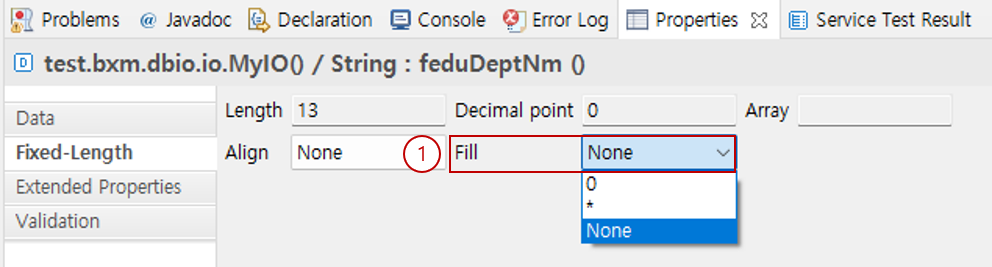
-
Select the character to fill the remaining space.
Example) When data='test', length='10', align='left'
-
' ': [test ]
-
'*': [test******]
If not specified - ' '
-
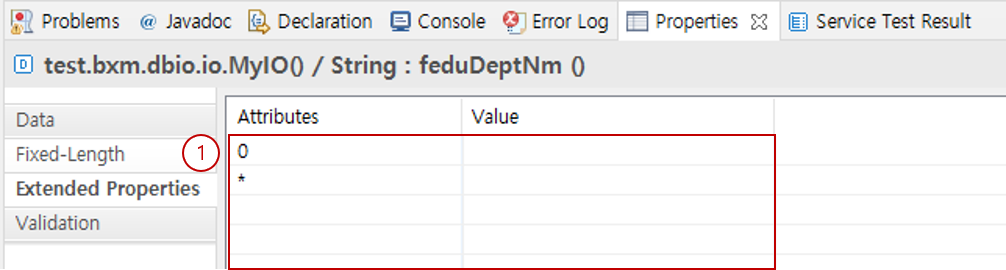
6.6. Extended Properties
You can register additional attributes required by the IO through admin configuration. You can specify values in the form of key=value.
-
Enter the required values for the registered keys.
6.7. Validation
You can specify the ID of the rule that validates the value of the property. In the system pre-process, the API corresponding to the specified rule ID is called to validate the value.
The rules that can be used can be specified in the admin configuration.
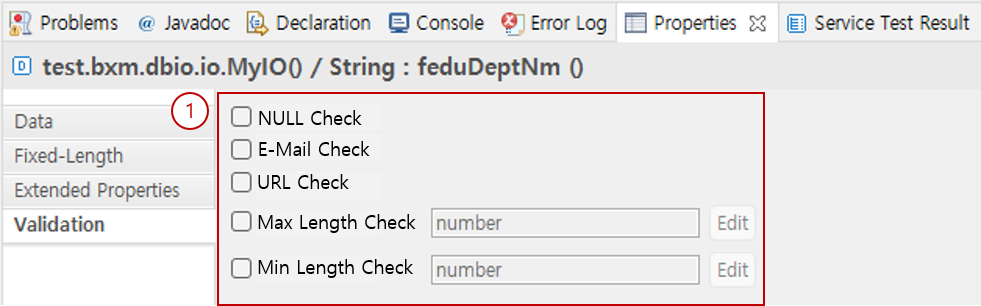
-
Select the rule to use for value validation. If a value is required for the rule, enter the required value.