데이터 입력 배치 프로그램 작성
BXM Center-Cut에서 제공하는 API를 사용하여 입력 데이터를 적재하는 배치 프로그램을 작성한다. API의 상세 spec은 다음 챕터를 참고한다.
1. 배치 job 예시
sample file을 읽어 센터컷 DB에 입력하는 batch job을 작성한다.
<?xml version="1.0" encoding="UTF-8"?>
<beans xmlns="http://www.springframework.org/schema/beans" xmlns:xsi="http://www.w3.org/2001/XMLSchema-instance"
xmlns:batch-int="http://www.springframework.org/schema/batch-integration"
xsi:schemaLocation="http://www.bankwareglobal.com/schema/batchex http://www.bankwareglobal.com/schema/batchex/spring-batch-ex.xsd
                    http://www.springframework.org/schema/beans http://www.springframework.org/schema/beans/spring-beans.xsd
                    http://www.springframework.org/schema/batch-integration http://www.springframework.org/schema/batch-integration/spring-batch-integration.xsd">

    <import resource="classpath:JobConfig.xml"/>

    <job-component xmlns="http://www.bankwareglobal.com/schema/batchex" id="jobcomp" with-dependon="true">
        <base-package name="bxm.dft.cc.bat.bean">
            <include name="DepositCcBatch*" />
        </base-package>
    </job-component>

    <job id="DepositCcBatch" xmlns="http://www.bankwareglobal.com/schema/batchex">
        <step id="DepositCcBatch_S01" parent="parentStep">
            <tasklet tm-datasource="MainDS">
                    <chunk reader="DepositCcBatch_R01" processor="DepositCcBatchBean" commit-interval="200" />
            </tasklet>
        </step>
    </job>


    <bean id="DepositCcBatch_R01" class="bxm.batch.item.file.AsynchronousFlatFileItemReader"
        scope="step">
        <property name="resource"
            value="file:////testData/CCINPUT_test.dat" />
        <property name="queueSize" value="400" />
        <property name="itemMapper">
            <bean class="bxm.batch.item.file.mapping.ItemOmmMapper">
                <property name="targetType"
                    value="bxm.dft.cc.bat.bean.dto.InterestCalculationBatchOut" />
            </bean>
        </property>
    </bean>

</beans>
2. 읽어 올 sample file 예시
bxm.dft.cc.bat.bean.dto.InterestCalculationBatchOut 의 FLD Format을 지키는 내용으로 sample file을 작성한다.
1         601   00000000000000000300
2         602   00000000000000000300
3         603   00000000000000000300
4         604   00000000000000000300
5         605   00000000000000000300
6         606   00000000000000000300
7         607   00000000000000000300
8         608   00000000000000000300
9         609   00000000000000000300
10        610   00000000000000000300
11        611   00000000000000000300
12        612   00000000000000000300
13        613   00000000000000000300
14        614   00000000000000000300
15        615   00000000000000000300
16        616   00000000000000000300
17        617   00000000000000000300
18        618   00000000000000000300
19        619   00000000000000000300
20        620   00000000000000000300
위 sample을 참고하여 더 많은 수의 데이터를 작성하여 테스트하는 것을 권장한다. 가이드를 위해서는 1000건을 작성하였다.
3. 배치 프로그램 예시
배치 프로그램은 Chunked 타입으로 개발하며, @BeforeStep과 @AfterStep을 추가하여 개발한다.
@BxmBean("DepositCcBatchBean")
@Scope("step")
@BxmCategory(logicalName = "이자입금센터컷배치", description = "이자입금센터컷배치")
public class DepositCcBatch implements ItemProcessor<InterestCalculationBatchOut, InterestCalculationBatchOut> {
    final Logger logger = LoggerFactory.getLogger(this.getClass());

    private CcutContext context;
    private final String CCID = "CCID";
    private final String DOMAIN_ID = "domainId";
    private int count = 0;

    @BeforeStep
    public void beforStep(StepExecution stepExecution) throws Exception {
        String domainId = BatchApplicationContext.getJobParameters().getString(DOMAIN_ID);
        String ccId = BatchApplicationContext.getJobParameters().getString(CCID);
        logger.info("Domain ID  [{}]", domainId);
        logger.info("CenterCut ID  [{}]", ccId);

        SimpleDateFormat date = new SimpleDateFormat("yyyyMMdd");
        String pcsnDt = date.format(new Date());

        // 접수 번호 자동 채번
        int acptNo = BXMCcutAcptNumberingUtils.getNewAcptNo(domainId, ccId, pcsnDt);
        logger.info("Generated new AcptNo: [{}]", acptNo);
        context = BXMCcutWorkUtils.startSelection(domainId, ccId, pcsnDt, acptNo, 1);

        logger.debug("%%%%%% CcutContext Info: [{}]", context);
    }

    @Override
    public InterestCalculationBatchOut process(InterestCalculationBatchOut input) throws Exception {
        BXMCcutWorkUtils.processSelection(context, input.getCusNo(), input.getIntAmt(), input);

        return input;
    }

    @AfterStep
    public ExitStatus afterStep(StepExecution stepExecution) throws Exception {
        if (stepExecution.getExitStatus().getExitCode().equals("COMPLETED")) {
            BXMCcutWorkUtils.endSelection(context);
        }
        return stepExecution.getExitStatus();
    }

}
사용하는 IO는 다음과 같이 정의 한다.
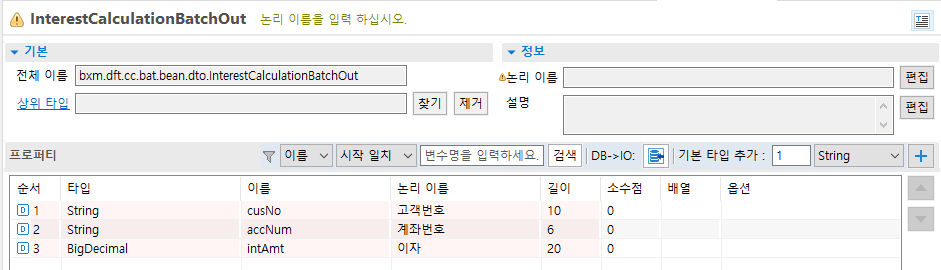
Figure 1. InterestCalculationBatchOut